BatchProcessing_byHrast · v1.3

Tutorial & FAQ

From the first run to a finished Post image, step by step. Short answers to common questions follow at the end.

Tutorial

A written walkthrough from first open to a finished Post run. Every screenshot is annotated; click an image to open it full size.

1. Install and open

  1. Add the repository (see Install) or unpack the zip under src/scripts/BatchProcessing_byHrast/.
  2. Restart PixInsight if you installed from a zip.
  3. Open Script → Batch Processing → BatchProcessing_byHrast.

2. Pre — Auto-assign

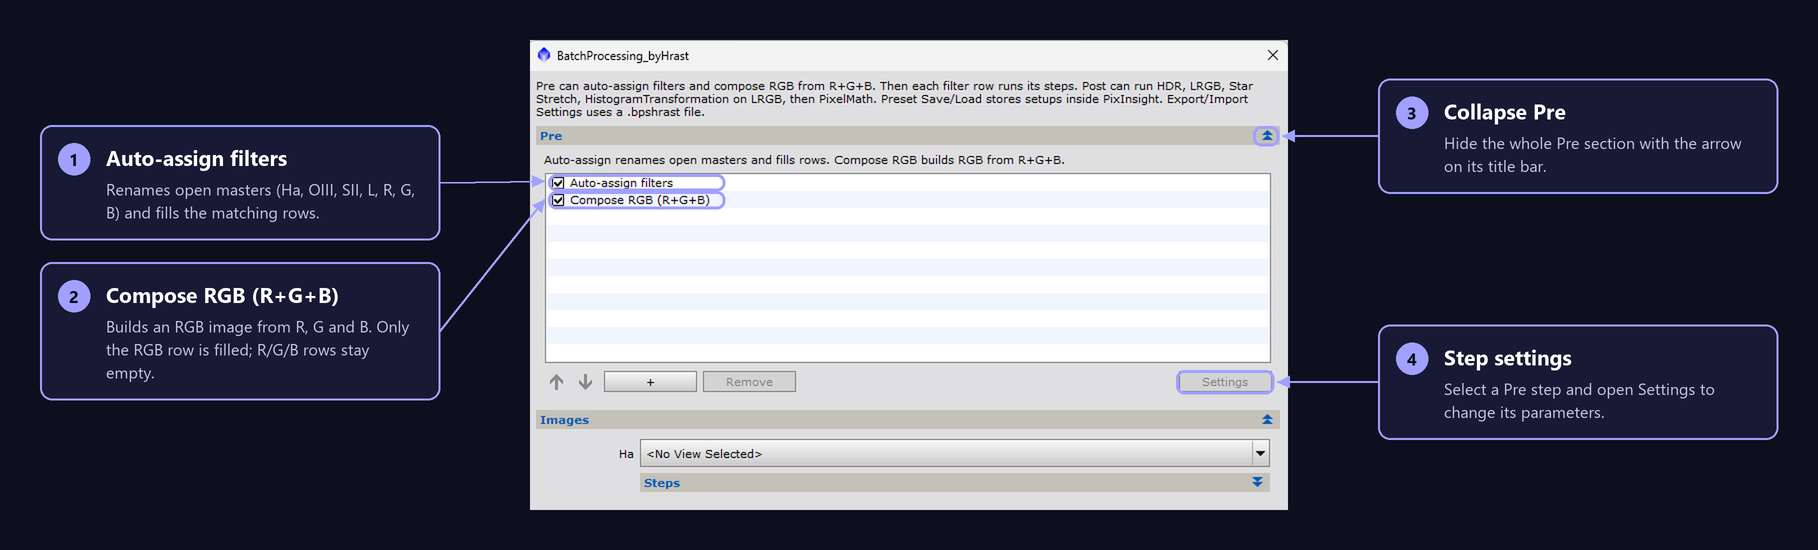
Pre section with Auto-assign and Compose RGB

Open the Pre section. Enable Auto-assign filters if your masters still have long names.

  • Detects Ha, OIII, SII, L, R, G, B, or RGB from the FILTER keyword or the file/view name.
  • Renames each view to the short id and fills the matching Images row.
  • Color (combined) images always go to RGB, never to mono R/G/B rows.

3. Pre — Compose RGB

Enable Compose RGB (R+G+B) when you have separate R, G and B masters and want one RGB image for the color chain.

  • Uses ChannelCombination (no L).
  • Renames the result to RGB.
  • Fills the RGB row and clears the R, G and B rows so only RGB continues in the filter chain.

4. Images — pick masters

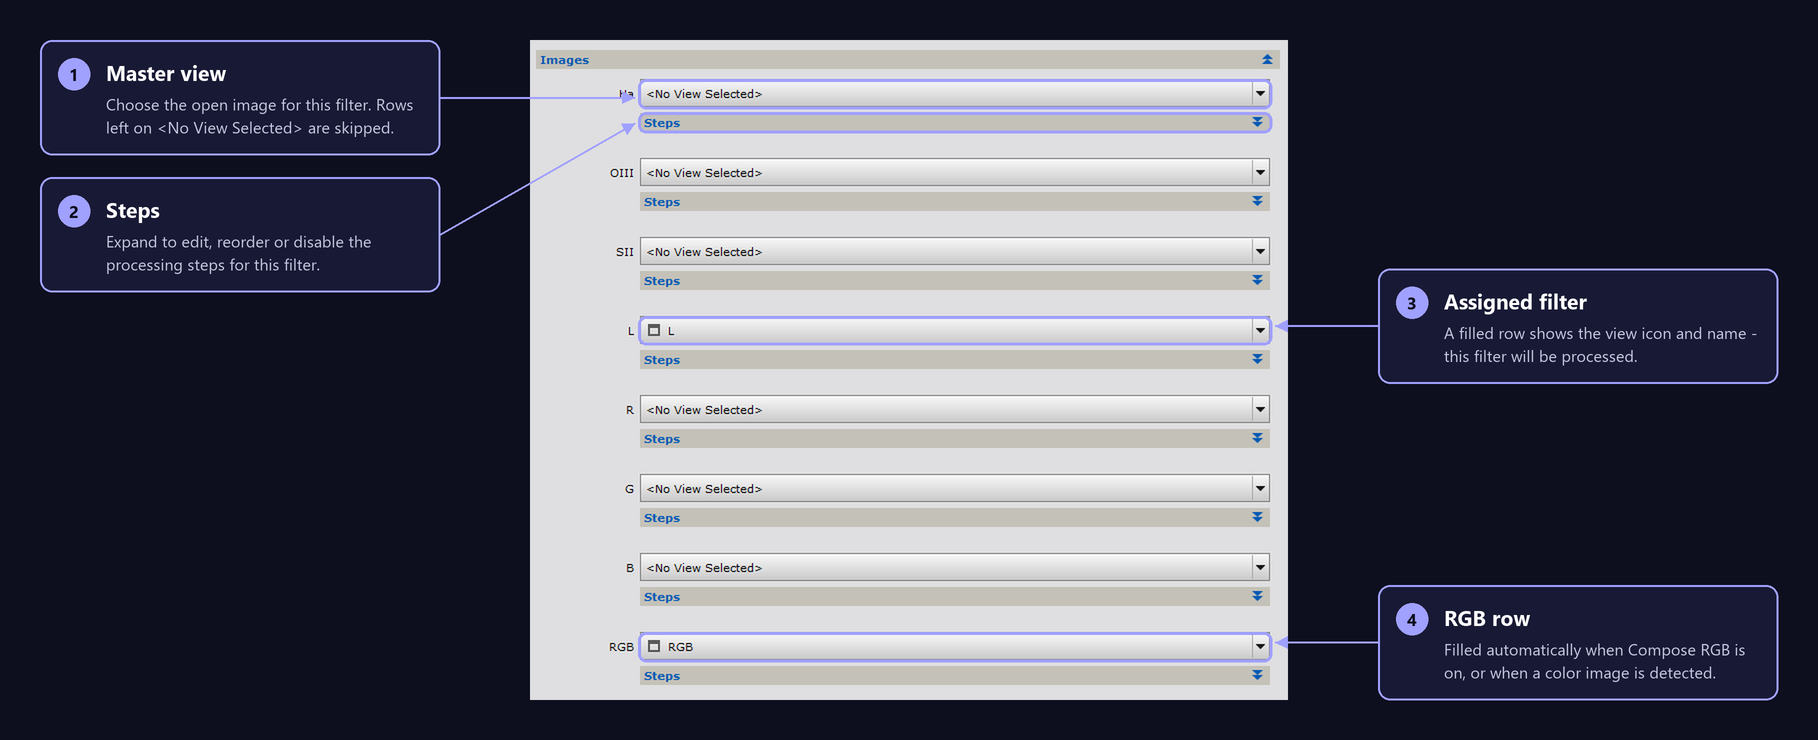
Images section with filter rows and Steps
  1. Open Images. For each filter you use, choose the open master from the list, or drop the image onto the row.
  2. Leave a row on <No View Selected> to skip that filter.
  3. Under every row there is a Steps bar with that filter’s own processing chain — see the next steps.

5. Steps — open, turn on/off, Settings

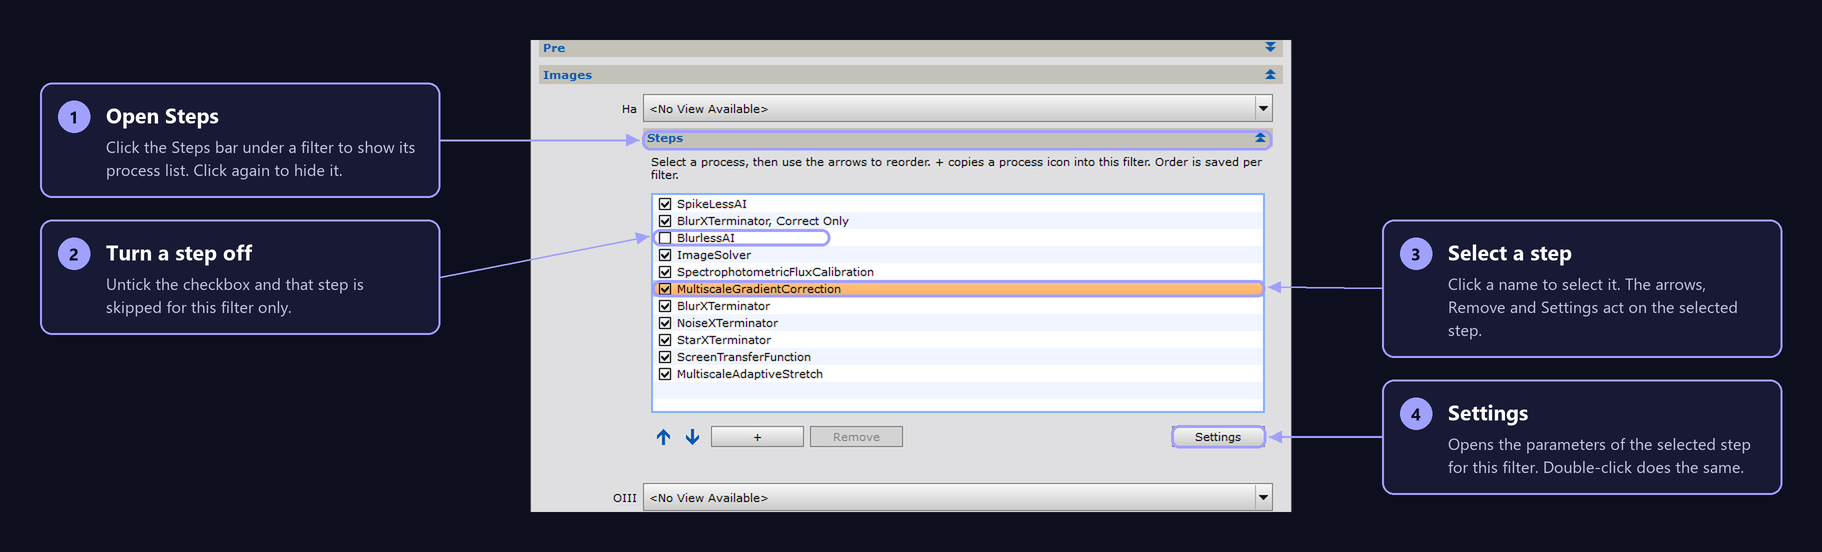
Steps list for Ha with one step unticked and one selected
  1. Click the Steps bar under a filter (for example Ha). The list of processes for that filter opens. Click the bar again to hide it.
  2. Turn a step off: untick its checkbox. The step stays in the list but is skipped when you click Process. In the example BlurlessAI is off for Ha.
  3. Select a step: click its name. The row turns orange, and the arrows, Remove and Settings now work on that step.
  4. Settings (or a double-click on the name) opens the parameters of the selected step.

Steps marked (not installed) are greyed out and always skipped.
6. Steps — settings per filter

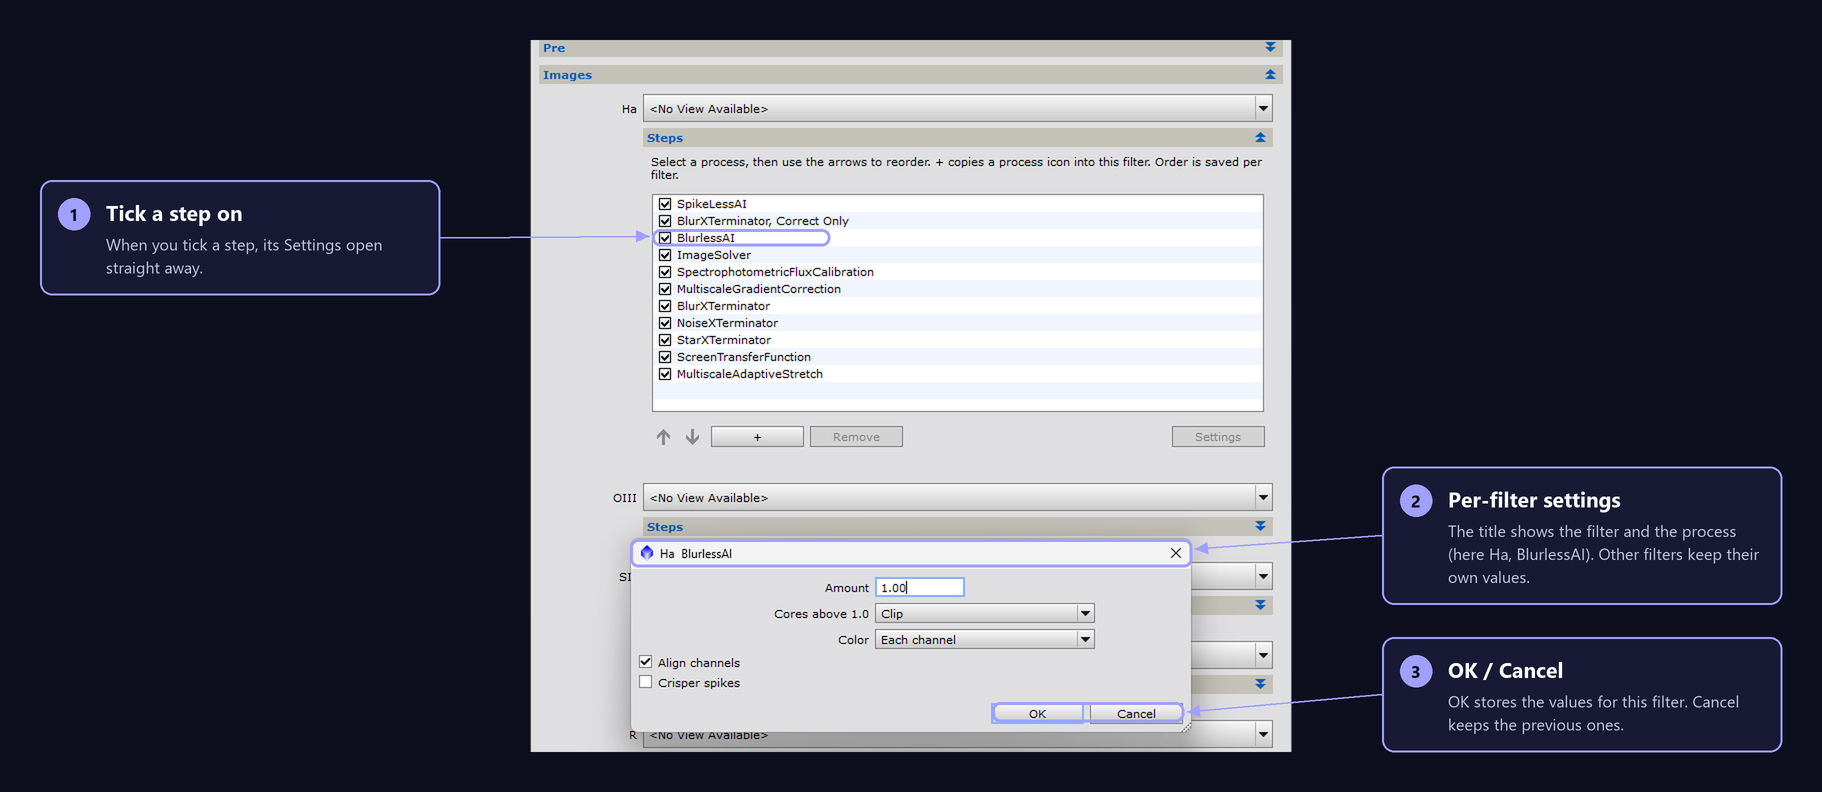
BlurlessAI settings window for the Ha filter
  1. When you tick a step on, its Settings window opens straight away so you can check the values.
  2. The window title shows the filter and the process — here Ha BlurlessAI.
  3. OK stores the values for this filter only. Cancel keeps the previous values.

Every filter has its own copy of every step. Changing BlurlessAI on Ha does not change OIII, SII or RGB.
7. Steps — change the order

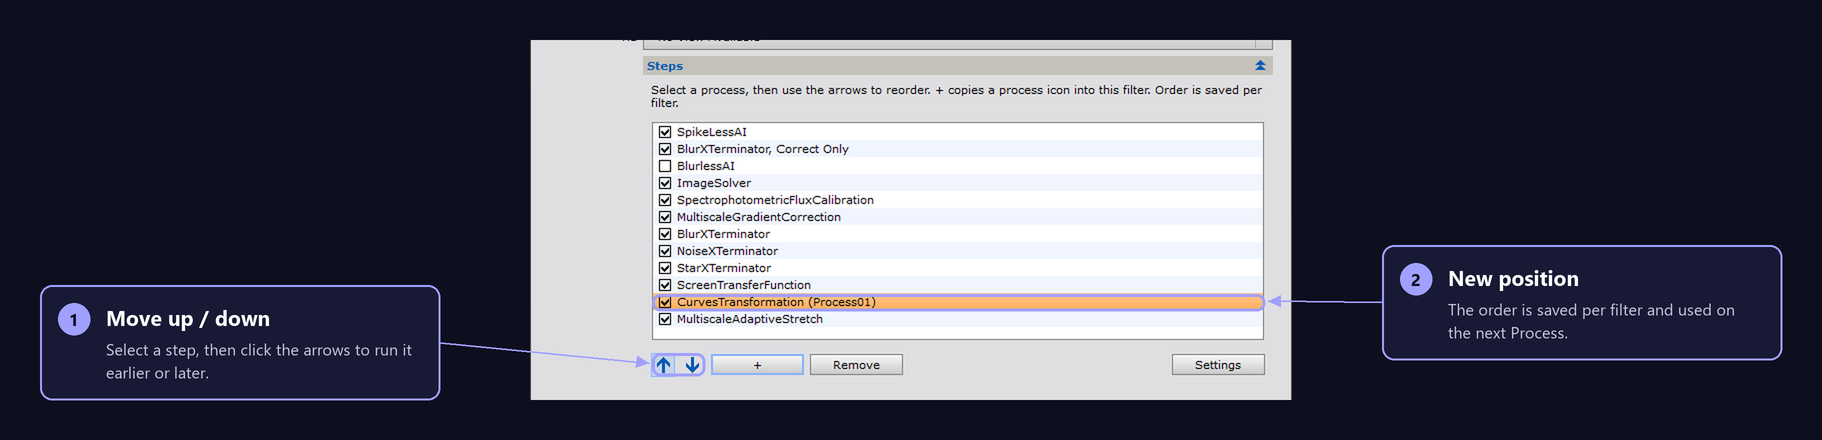
Moving a step up with the arrow buttons
  1. Select the step you want to move.
  2. Click ↑ to run it earlier or ↓ to run it later. Each click moves it one row.
  3. Steps run from top to bottom. The order is saved per filter and remembered next time.

8. Steps — add your own process

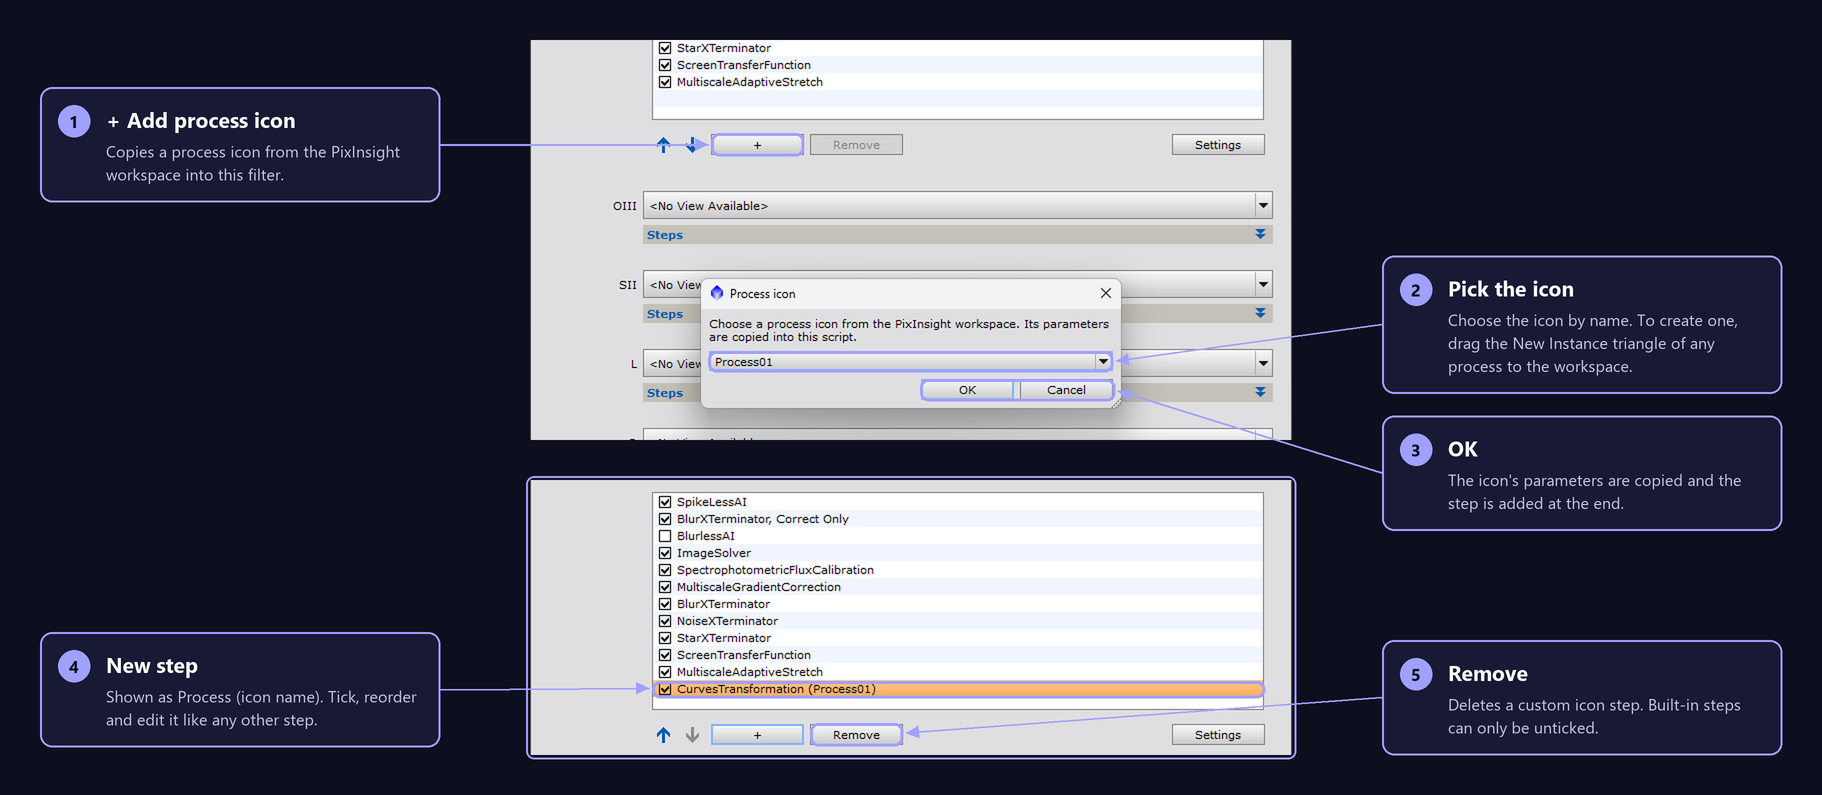
Adding a CurvesTransformation process icon as a new step

Any PixInsight process can be added to a filter’s chain through a process icon.

  1. Create the icon first. Close the script, open the process you want (for example Process → IntensityTransformations → CurvesTransformation), set it up, then drag the New Instance triangle (bottom-left of the process window) onto the workspace. An icon such as Process01 appears.
  2. Start BatchProcessing_byHrast again and open Steps under the filter.
  3. Click +. In the Process icon window pick the icon by name and click OK.
  4. The new step is added at the end, named after the process and the icon — for example CurvesTransformation (Process01). Its parameters are copied from the icon.
  5. Use the arrows to move it where it should run.
  6. To delete it, select it and click Remove. Only added icon steps can be removed; built-in steps can only be unticked.

The step belongs to that filter only. Add it again under another filter if you need it there too.
9. Post — finish the color image

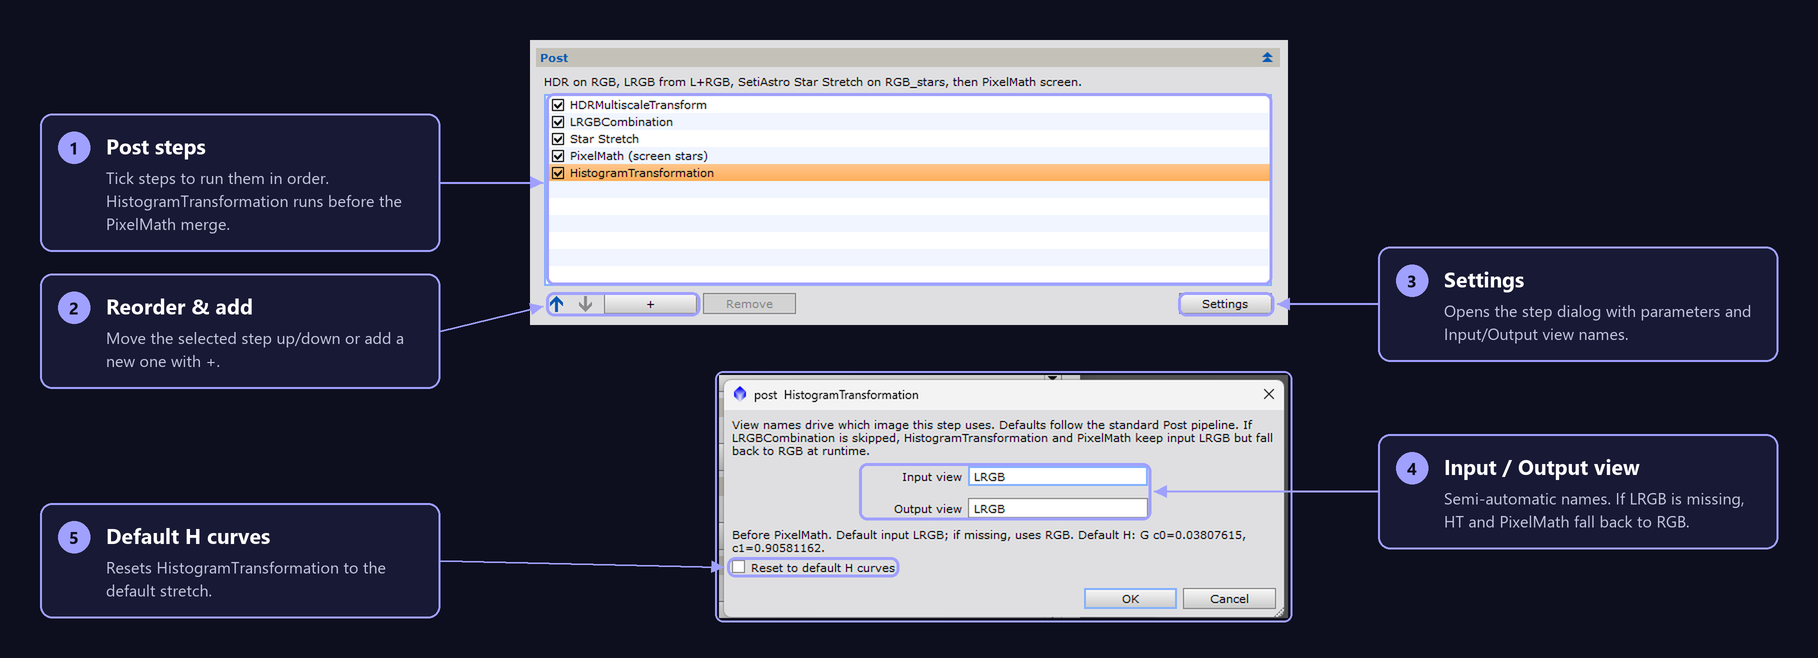
Post steps HDR LRGB Star Stretch HT PixelMath

Open Post and enable the steps you need. Typical order:

  1. HDRMultiscaleTransform — default input/output RGB
  2. LRGBCombination — L + RGB → LRGB (skip if you do not use L)
  3. Star Stretch — SetiAstro script on RGB_stars
  4. HistogramTransformation — default on LRGB; falls back to RGB if LRGB is missing
  5. PixelMath (screen stars) — screens stars onto the target; same LRGB→RGB fallback

In each Post step Settings you can edit Input / Output view names so the chain matches your naming.

10. Presets — Save and Load

Preset dropdown Save Load Export Import Process
  1. Dial in Pre, Steps and Post the way you like.
  2. In the Preset box, type a name (for example Galaxy or Narrowband).
  3. Click Save. The profile is stored inside PixInsight — no file dialog.
  4. Later, pick the name and click Load.
  5. Default + Load restores factory Pre/Post/step defaults. Selected images stay.

11. Export / Import Settings

  • Export Settings writes a .bpshrast file for backup or sharing.
  • Import Settings reads that file. Images already selected in the dialog are kept; process order and parameters are replaced.

12. Process

  1. Click Process.
  2. Pre runs first (if enabled), then each non-empty filter row, then Post.
  3. Missing optional tools (BlurX, NoiseX, StarX, SpikeLessAI, BlurlessAI, Star Stretch script) are labeled not installed and skipped.

Video tutorials

Watch the script in action, oldest video first. New videos are added as they come out; each one links to the matching written steps above.

FAQ

Short answers to the questions that come up most often.

Do I need BlurXTerminator / NoiseXTerminator / StarXTerminator?

No. They are optional. If a process is not installed, the step shows (not installed) and is skipped. The rest of the chain continues.

I enabled Compose RGB — why were R, G and B still filled?

In 1.3 Compose RGB always fills the RGB row and clears R/G/B after combining. Update to 1.3 if you still see the old behaviour. Auto-assign may fill R/G/B temporarily so Compose can find them; after Compose they are cleared.

I do not shoot luminance. What about LRGB and HistogramTransformation?

Skip LRGBCombination. Leave HistogramTransformation and PixelMath on their default input LRGB — if that view does not exist, they fall back to RGB automatically. Or set Input/Output to RGB in Settings.

Where is Star Stretch from?

Post Star Stretch loads Franklin Marek’s SetiAstro star_stretch.js (not a reimplementation). Place it next to this script, under a SetiAstro folder, or keep the official SetiAstro install under PixInsight scripts.

Preset vs Export Settings — which should I use?
  • Preset Save/Load — quick profiles inside PixInsight (Default, Galaxy, …).
  • Export/Import — .bpshrast files on disk for backup or sending to someone else.
The dialog is taller than my screen. What can I do?

Collapse Pre, Images or Post with the section arrows. Only open the part you are editing. The help line and Process/Close buttons stay visible.

Can parameters differ per filter?

Yes. Every filter has its own Steps list and its own Settings. Changing MultiscaleGradientCorrection on Ha does not change OIII.

What does the + button do under Steps?

It copies a process icon from the PixInsight workspace into that filter’s chain, including the icon’s saved parameters. Use Remove to delete a custom icon step.

Does Import/Load change which images are selected?

No. Selected views stay as they are. Only process order, on/off state and parameters are replaced.

PixInsight version?

Built and tested for PixInsight 1.9.5 and newer in the 1.9.x line.